
Wednesday, October 27, 2010
Monday, September 20, 2010
1:1 Pixel Mapping on a Vizio (or other LCD TV): Advanced Settings and Method
My particular model is a VX32L. To get PERFECT (!!) 1:1 pixelmapping, here are my settings (for 720p resolution):
You can adjust these settings if you have any ATI or NVidia video card made since 2006ish, it's (almost) always helpful to update to the newest drivers for your video card, so go to the manufacturers website and do that first. Otherwise, if you can't figure it out, it is easier to adjust these timings with the (free) program: Powerstrip.
Below are the settings in the NVidia control panel, and the text version of the those settings to the right.
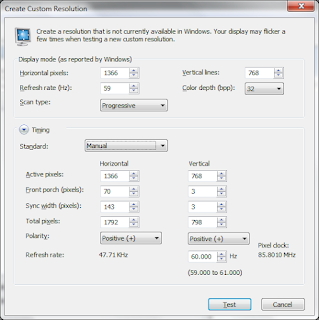 Horizontal:
Active Pixels: 1366
Front Porch: 70
Sync Width: 143
Back Porch (or Total Pixels): 213 (or 1792)
Polarity: Positive (+)
Vertical:
Active Pixels: 768
Front Porch: 3
Sync Width: 3
Back Porch (or Total Pixels): 24 (or 798)
Polarity: Positive (+)
Next Step:
Sometimes even with perfect timings, Vizios will not perform 1:1 pixelmapping. In order to assist the TV's automatic adjustment, it is very helpful to set your desktop wallpaper with this test image. Set the image to "tile" your background so it repeats (rather than "center" or "stretch"). (If you have trouble with this step, here is a very good description.)
Finally, while your are on your desktop and the test pattern is showing, take your TV's remote, and hit "Menu," then navigate to "Auto Adjust." Hit "OK" and allow your TV to auto adjust to perfect 1:1 pixelmapping!
(Why 1:1 pixelmapping? This site is very helpful)
Thursday, April 15, 2010

Saturday, October 24, 2009
Wednesday, October 7, 2009
Four Simple Steps to Make Your Computer Run Faster
1.)
a. Download and install Revo Uninstaller (Freeware: http://www.revouninstaller.com/). This is a more advanced un-installation program than Windows’ as it searches the registry and your hard drive for files left by the built-in uninstaller. 
b.
c. Next, click “advanced” to do a more thorough scan.
d. Once the built-in uninstaller is finished, Revo will scan for leftovers. Delete these files.
2.)
a. 
b. Now, type “msconfig” and then press enter. This brings up system configuration.
c. Click on the “Startup” tab.
d. Find programs that you don’t need running in the background when you start your computer. You should have very few startup programs in Vista. ITunes and QuickTime are good examples of programs to uncheck. Important: If you are unsure of a program, don’t disable it; look for the program in Google to find out whether it is important to startup this program.
e. Finally, click “OK” and then click “Restart”. This process will make your boot time faster and allow your system to run without unnecessary processes bogging it down.
3.)
a. Once your computer is restarted, Download and install CCleaner (http://www.ccleaner.com/). 
b. CCleaner (originally “CrapCleaner”) cleans all the “crap” out of your computer. It checks the registry, temp files, the recycle bin and many other sneaky places where crap builds up on a computer. Run CCleaner.
c. There are four tabs on the left: Cleaner, Registry, Tools and Options. Click Cleaner first.
d. Click “Analyze”. (The default settings for the scan are ideal in most situations; leave the checkboxes the same).
e. Next, click “Run Cleaner”. This permanently removes files from the recycle bin and elsewhere, so make sure there is nothing in the recycle bin that you want to keep!
f.
g. Click “Scan for Issues”
h. Click “Fix selected issues”
i. CCleaner will now ask you if you want to back up your registry. It is a good idea to back up your registry prior to making any changes in case something goes awry, however, CCleaner has never caused any problems for me.
j. Once fixing registry issues, close CCleaner.
1.) The final step in increasing your PC’s performance: organizing the hard drives, page file and registry (Okay that's really three small steps, but these are easy ones.)
a.
b. Install NT Registry Optimizer (ntregopt). At the end it will say “Do you want to run  ntregopt?” (Important: when making changes to the registry, it is imperative that you don’t make other changes that interfere. For instance, make sure that Windows Update didn’t make any automatic updates.)
c. Check on this box and click “OK” to start registry optimization the process.
d. Restart your computer to activate the new registry.
e. Download PageDefrag (Free: http://technet.microsoft.com/en-us/sysinternals/bb897426.aspx) Sysinternals is the company that created this software. Microsoft bought them because of their high quality work.
f. Extract “pagedfrg.exe” from the zip file and run this executable.
g. Select the “Defragment at next boot” dot and click “OK”. Now, restart your computer.
h. Finally (!), download MyDefrag (previously JKDefrag. Free: http://www.mydefrag.com/). This will organize or “defragment” your hard drive, as well as optimize important files by putting them near the outer part of the HDD. This program is largely regarded as the best defragmenting software. (Note: make sure you have run CCleaner first otherwise you will waste time organizing unnecessary files.)
i. Install MyDefrag
j. Run MyDefrag from the Start Menu by clicking on “Slow Optimize”. You should use slow optimize if you have rarely or never defragmented your hard drive. This defragments and alphabetically sorts the files of all mounted drives. 
k. Make a sandwich. Depending on the size and speed of your drive, this process will take a while. It is ideal to defragment over night. Nice work! Your computer should now be running faster.
Thursday, December 4, 2008
Four Tet - Crawl, End Crawl from Quantum of Solace Download Links
These are links to a song in the final credits of the latest James Bond, Quantum of Solace. Four Tet created this song entitled "Crawl, End Crawl". It's a great song, but not on the James Bond soundtrack! So, here are download links for the song. These files are derived from the DVDScr of Quantum of Solace, audio originally in AC3 format. AC3 is a lossy container (I believe). Mp3 is 320 kbps and better than other versions currently out.
I have apple lossless version too, although, I don't know if it sounds any better as it is derived from a lossy format.
Here:
Apple Lossless format (.m4a):
http://www.megaupload.com/?d=9SOTHGH5
.mp3, 320 kbps:
http://www.megaupload.com/?d=C7U267JE
Great song.
I have apple lossless version too, although, I don't know if it sounds any better as it is derived from a lossy format.
Here:
Apple Lossless format (.m4a):
http://www.megaupload.com/?d=9SOTHGH5
.mp3, 320 kbps:
http://www.megaupload.com/?d=C7U267JE
Great song.
Friday, November 28, 2008
Big Mountain, Whitefish, Montana Time Lapse Videos
I created some time lapse videos from the Big Mountain web cams today. They look pretty good on YouTube high quality:
Here's how.
1. Get a program called Ripper by Nimisis, or something similar.
2. find a website that hosts a live webcam, like this one, there are many.
Note that the extension must end in a picture format, like .jpg or .png etc. If a website does not, simply right click on the picture and select copy link location.
3. Paste this link into Ripper or other such software.
Ripper will automatically take a copy of the picture in intervals of your choice. Note than many web cams update once every minute.
4. Now that the pictures are on your hard drive, (make sure there are a lot as good time lapse is 25 frames per second!) you can use Ripper to create an AVI video. I created mine without compression to look the best.
Now to upload to YouTube in high quality using Any Video Converter:
5. Transcode the AVI to an MP4 using Any Video Converter (free)
-first add the .avi we just created in Any Video converter
-then Select Customized MP4 in profiles
-next, in video options choose:
codec: x264
Size: 640x480
Bitrate: 2500
Framerate: 30
6. Sign into your youtube profile and upload that baby.
Here are a couple more examples:
Subscribe to:
Comments (Atom)
